Ever made a warp zone portal, only to find a hall-of-mirrors (HOM) or worse, crash? All is not lost. You could try deleting the portals and remake them from scratch. This is a last resort. Before you do, try these:
In this tutorial, you will learn something about zones, especially warp zones. Classic, beautiful examples of tricks
you can do with portals can be found in maps such as deCyberEscher and TwistedCrypt. What you will find here will
help you make maps like that, and stuff you may not have thought of.
This tutorial assumes you know basic editor functions. Please see these excellent resources first:
Portals Overview - UnrealED
Portals - Wolf's Unreal
Portals - UnrealED
Portals - Dr. SiN
Teleports - deCyber Unreal
Now that you have a cookbook methodology for creating one type of portal, we will explore the how's and how-not's,and
some tricks.
Symmetry: When stuff looks the same on one side as another, like a mirror image. You have mirror symmetry
from right to left.
Asymmetry: When stuff doesn't look the same from one side to the other, no matter how you turn it or mirror
it.
Zone: In Unreal, a closed area defined by a Zone Info object.
Warp Zone: In Unreal, where crossing a zone portal takes you somewhere else. Unlike a teleporter, you can
see through a warp zone portal into another area as if it were adjoining.
Warp Zone Portal: a flat sheet made in such a way that you can move, see, and shoot through it, which lets
you go from one place to another separate place.
HOM or Hall of Mirrors: An effect in Unreal when playing, usually unintended, which is a lot like looking
into a hall of mirrors. This is generally caused by sloppy level design.
Polyhedron: A 3 dimensional object. Like a polygon is a 2 dimensional object.
Regular Polyhedron: One with lots of symmetry. A cube is a good example.
Polyhedra: More than one polyhedron.
Centrifuge: A thing that spins, in this case to produce gravity. Often found at amusement parks.
Ever made a warp zone portal, only to find a hall-of-mirrors (HOM) or worse, crash? All is not lost. You could
try deleting the portals and remake them from scratch. This is a last resort. Before you do, try these:
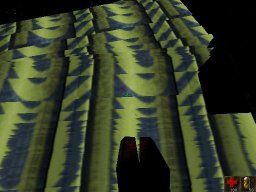
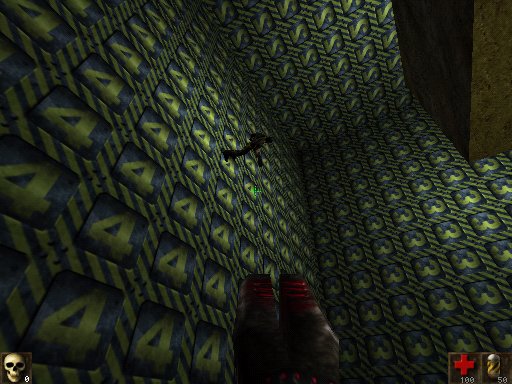
1. Assign a non-symmetric texture to your portal's surface. The Engine group has some nice
ones. I usually pick the guy with the arrow. Assigning this to your surface may show the problem: alignment.
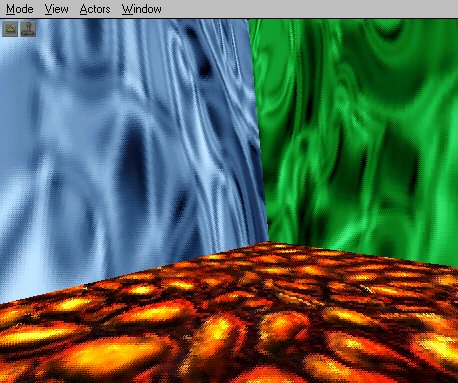
The blue and green walls are zone portal brushes. Can you tell?
Ahh! See? Now you can tell how those surfaces are aligned. They aren't.
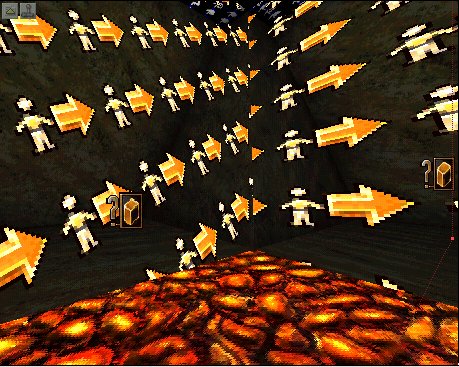
Hit F5 until the Surface dialog appears. Hit Align and then pick something nice. If your portal is roughly wall-like,hit the Wall button. If it's fairly horizontal, hit the Floor/Ceiling button. For good measure, hit the One Tile button, although this may not make it one-tile.
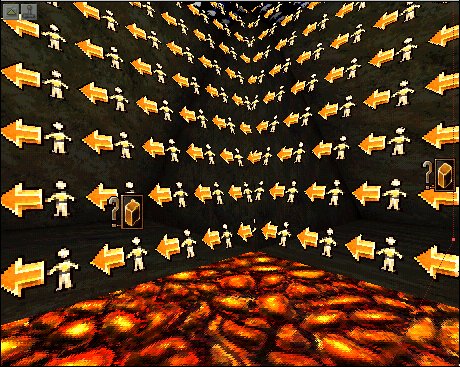
All nice and aligned now.
You should do this for all your warp zone portals. Rebuild Geometry (F8) and play. NOTE: If you move, rotate,scale, or vertex edit the zone brush, you should repeat this, because those actions can mess up alignment.
2. If that didn't fix it, you may need to flip a zone portal brush. This means physically turning the polygon around. Choose one of the zone portal brushes, source or destination, that is giving you trouble.Read and follow Turning a Polygon Tutorial. Go to step one and try it again.
3. If that still gives you garbage, chances are your geometry is off. Make sure the zone
portals are the exact same size and shape. If they are symmetric, this will be easier. If they are not, you will
have a hard time. You can use vertex edit with snap to grid to help you. If you are good with the rotate tool,you
could try copy/paste, and then move and rotate that new brush to where it needs to be. Don't forget to go to step
one.
4. If your portal seems right, but you are not crossing over to the other side, chances are the area behind the zone portal is not 'deep' enough. Try making that roomier, but don't change the portal's shape, just how much is behind it.
5. If that doesn't work, there may be a possibility (someone correct me on this), that the area behind the portals must have matching geometry. Try making the area behind your portals symmetric, go to step 1.
6. When you rebuild geometry, click on the BSP tab, and play with the settings there.You may get better results by setting Optimization to high, and cuts to low. Use the 3d view and the Zone option to see what you have. You should see distinct shades for each of your zones. If you are doing a centrifuge, each 'room' will have (at least) three zones.
7. Try this: select your portal brush(es), hit Cut, then Paste and reposition them. For some reason, this sometimes helps. Perhaps it has something to do with the ordering of the brushes in the file or object hierarchy, and this will put them in as 'newest'??? Clanless suggests: There is a much easier way to do this, right click a brush and you can set the brush to either first or last through the little order menu. Try both, can't hurt.
8. From Wanderer: Try setting the zoneinfo's property Advanced/bDirectional to True. This will give the Warpzoneinfo arrows. Then point the matching zones' arrows towards each other.
9. There are limits to what you can do with multiple portals touching each other. I have not fully explored this, but it seems that you must have some sort of opaque brush between them. Not to say that the opaque geometry must be opaque in the game, or that it has to have any real dimension. But it seems like there should be something there. Let's take a for-instance: Let's say you want a 'room' which consists of 4 zone portals,each looks into another zone. If you have the 4 zone portal brushes just touching, forming a box (technically a4-sided cylinder, assuming you have a normal floor and ceiling), this may not work. The reason is that if you step through one of those and look back, you would be able to see the 'back' side of the one you went through, and possibly one of the other portals' backsides too. But, if you put 4 large pillars in, such that each zone brush touches two adjacent pillars, it would block the view of any other zone brush's back side. Actually, what you'd want is 4 little rooms (closets) off of your central room. These 'closets' will be empty except for the warp zone info token object. Now the magic: if you adjust the zone portal brushes so the coincide with the corners of these closets,you won't see any closet parts at all, the 'pillars' disappear, and you have what you were after, an area connecting 4 warp zones.
10. For some reason, even if you have separate and distinct rooms (this applies to skyboxes too), the geometry of one room can affect the BSP of other rooms. You can actually trace some wall or surface through vast space to see where it intersects (and messes up) the BSP of other rooms. Use the 3d view and Polygon and Zone views to look for these things, and play with the Build sliders. If all else fails, you may need to move entire rooms to farther parts of the universe, to avoid this phenomenon. In my example maps, I place the rooms along the grand diagonal of the universe's cube.
Now that you (hopefully) have a working portal, you may notice that it looks more like a mirror, one you can cross through, like Alice through the looking glass. Or the world beyond may appear rotated or flipped. Well, this is all due to alignment. Choose a zone portal surface, hit F5 for the surface dialog, and hit the Rotate tab. Play with that. This can get your portals to line up straight, if that's what you want, but perhaps you are doing something interesting, like deCyberEscher, and you want that 'wall' in there to be a floor when you cross into it. Rotate!You might want to try playing with scale too. I don't know that it will produce anything usable, but it can make some interesting effects. If you wanted to make fun house mirrors (software renderable too!) you could play with portals and put a transparent impenetrable wall in front of them.
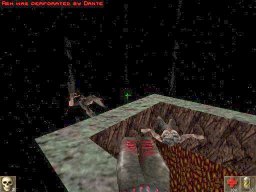
Why limit yourself to orthogonal surfaces? I mean, floors, ceilings, and walls. If you angle the zone portal brushes, you can create curved surfaces, like planets and spaceship gravity areas. Just about anything you want.Here is a room in the style of M. C. Escher.
AnEscherRoom.zip
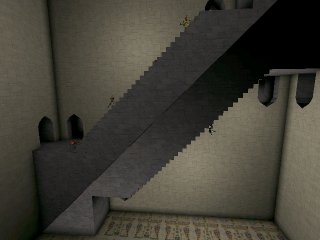
Note players on both top and 'bottom' of this Escher staircase.
Actually, it's two rooms cut at 45 degrees, with symetric
staircases hugging the portals, linked back-to-back.
This is crudely thrown together, but with proper lighting
could be very convincing.
Let's say you want to create a planet that players can run around on. Your first thought may be to create a
sphere hanging in a large space. Try that. You will fall off pretty quick. O.K., so you could create some zones,and
set the direction of gravity to always point toward the center of that sphere. True, but the catch is, there is
only one 'up' in the game. I'd hoped that setting the rotation of the zone info would affect the 'up' orientation,but
I could not get that to work. If you know how, let me know (see tip 8 above for a possible clue). So, let's say
you do that anyway, what would happen is you could sorta stick to your sphere, but you'd be 'on your head 'when
at the 'bottom' of it. If that's what you are after, go for it.
To get a rounded surface where gravity points down and you are right-side up, you can make a bunch of areas, all
connected by warp zones, and angle the zone portals to make the boundaries appear to curve. Some effects you can
achieve: a planet surface, a centrifuge for space ships (those hamster-wheel things as in 2001: A Space Odyssey,Mission
To Mars, Babylon 5, Ringworld, etc.), Escher worlds, and things such as high-gravity
barrel rolls and playing on the inner surface of a sphere or box or whatever.
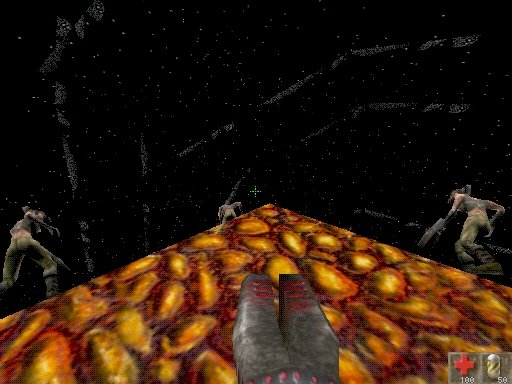
This is three rooms linked end-to-end.
RingWorld. A gargantuan hamster wheel in space.
You can just make one 'room' and set the portals to reenter the room, and you'll get cool effects, not very playable,but
perhaps some sort of cheap hall-of-mirrors for a funhouse level or something. To get a believable playing surface,you
should pick your geometry carefully. Symmetry is your friend, asymmetry is for the brave and foolish. For good
planet surfaces, consider regular polyhedra, the Platonic solids come to mind. These are the Dungeons and Dragons
dice you are all so familiar with: tetrahedron (4 triangle sides), cube (6 square sides), octahedron (8 triangle
sides), dodecahedron (12 pentagonal sides), and icosahedron (20 triangle sides). Having done a cube by hand, I
can tell you, this is not for the faint of heart, but the cube is the easiest one to do. I have provided an example
for you, please see ChinaSyndrome.zip. You don't have to stop there, there are
many polyhedra that can work, I have a large collection of them for you at here. I have
a program that can read in a brush (such as these polyhedra) and produce 'rooms' that can get you started. In case
you haven't checked the examples, what these planet 'rooms' look like are basically cup shapes - smaller on the
bottom, wider on the top, and zone portals from ground to sky, angling out. There are limits to what you can do,see
below, The Outer Limits.
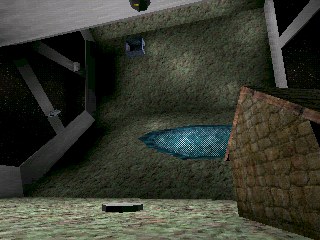
The good and bad. This is one room cross linked to itself. The room was basically square,
but the walls are not angled to 45 degrees, so the geometry is off. Looks somewhat
spherical, but it's not.
To get a centrifuge, you would angle the walls in, so the bottom is wider than the top. Then you can run up the walls and across the ceiling like nobody's business. You may need something in the center, to hide the central junction of all those zone brushes. In the case of spaceship centrifuges, this probably is fine. For hollow structures,you may need to have something floating in the middle of the room, maybe a decoration or something really bright to help hide the solid bits. Examples: Hollow Earth (a sphere) or Ringworld (a cylinder), each could have a central 'sun' to hide the central zone brush junctions.
Based on my experience with the centrifuge in ringworld, I offer this: it is very easy to make a 4-sided centrifuge,because
you can use simple editing to angle the portals at 45%. Seven sides will hit the see-through limit (see below).
So six sides is the ideal max. But, to get things to line up, you need a ratio of sin(60 degrees) of floor to wall.
That means if the distance along the floor under the portal is 100 units, the distance up the wall for the portal
would be 86.6025403... units. And ain't no amount of grid snapping gonna save you here. For this, you need to be
tricky. Here's what I did:
Make the room four times as long as it is high (wall to floor ratio is 1:4). Now add your zone portals at a 45
degree angle. You will be able to fit both in, just barely, and they'll touch each other in the middle, and touch
the walls at each end. Select all brushes, Transform/Transform Permanently. Now, with the 3 brushes (room and two
portals) selected, open the properties for the Brushes, Brush/Main Scaling, and set the Z scaling factor to 1.732050808,leave
the X and Y at 1. This will stretch the brushes up, and probably mess up their alignment. That's ok. Stretch the
room a little wider anyway (you may have to). Move the portals back in proper alignment with the room. Select all
brushes, Transform/Transform Permanently. Now your portals are at the proper angle, 60 degrees. How did I get 1.73blahblahblah?
That's tan(60 degree). Why tan (tangent)? That's the ratio of rise/run, or wall/floor. Why 60?360 degrees in a
circle divided by 6 segments = 60. BUT, that's just a coincidence. That 60 is the angle at the center of the hub.
To get the angle of the walls, it's (180 - hub ) / 2 = (180 - 60) / 2 = 60.
If you wanted a five-sided centrifuge, you would do the same thing, but the ratio is tan(180-(360 / 5))/2) which
is tan(54), which is 1.37638192.
Thank you Ms. Borz, thank you Mrs. Kent.
Oh hell. Hear you go. Use these. You can resize these to suit, as long as the slope of the portals remains the
same.
Five-sided ring - PentaRing.unr
Six-sided ring - HexaRing.unr
Note that these ratios can also be used for anti-centrifuges ("barrel rolls" or cylindrical 'planets').
Notice the guy on the wall. He thinks you are on the wall.
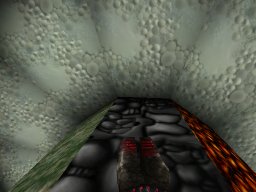
You can have some fun with portals in tunnels, to make the near seem far, and the far seem near. Warp Zones are like wormholes - they let you cross space in nothing flat. But that can be reversed too. Let's say you have created a planet, and want a short-cut from one side to the other. You could drill holes in two opposing rooms,and put a portal near the bottom of each, leading to the other. See my example ChinaSyndrome.unr(now includes the texture file).
Note the zone walls are angled 45 degrees
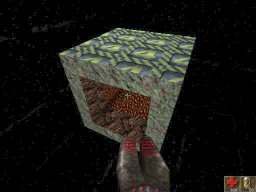
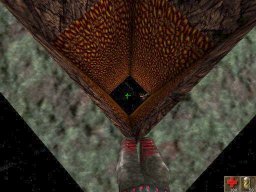
That blob way down there to the right of the green cross hair is looking back at you.
On the outside, the world is small. But the tunnel through the middle looks much deeper than it should be. This was to illustrate the good and bad of this trick. That tunnel can be very very long. You could put Hell at the bottom of each (design Hell in two parts), and the person could fall for a long time, zip right through the middle,and pop out the other side. Or stop in Hell and shoot some baddies. Now here's some physics trivia questions: If you could put a hole right through the middle of the Earth, and safely go through it A) what is the force of gravity like at the center? B) How fast would you be moving when you got to the other side? C) How long would it take?Answers: A - zero, B) - zero, C) 45 minutes. The reason for A) is that at the center, the entire planet is pulling on you equally from all directions, summing to zero. So, if you are pulling this trick, you may want more than one zone in the tunnels, with zero in the middle, and normal at the surface. The reason for B) is that you accelerate toward the center, which means you decelerate as you leave the center, and your speed is back to zero by the time you get to the other side. C) is particular to the real Earth, you can do whatever you want. Note that unless you move to the side, you will fall back through, and keep doing this forever (neglecting wind and stuff). More trivia:if your hole does not go through the center, but, say, from New York to Los Angeles, the time is the same: 45 minutes.
Unreal/UT has a limit of 64 zones total. My guess is the Level Info is one of them. That's not a lot, just enough to make a 12-sided or 20-sided world. Each area is one zone, and each edge is another. So for an icosahedron, you have 20 sides, each side has 3 edges. 20 x 1 + 20 x 3 = 80, too much! But you might be able to do something cheezy like link all the interiors with a 'sewer system' of tunnels to create 1 zone for all interiors. This flies in the face of good level design, but it's a shot. There are smaller polyhedra that would work, but are not as round.There is a football shaped 10-sided shape, and of course the octahedron, which is 8 triangular faces. 8 x 1 + 8x 3 = 32, no problem. You can still make larger worlds using dodecahedrons and buckyballs, but the total number of areas will not cover the planet with unique areas. Meaning, 'you' will appear more than one place in the world.For example, you could make a dodecahedron world using 6 areas instead of 12, (46 total zones), and link them in such a way as to look like it has 12, but it's really 6. And if you do it right, 'you' would always appear on exactly the opposite side of the 'world'. So, if you are on the north polar region, you are also on the south polar region,they are the same. This should be ok, because you shouldn't be able to run into yourself. The only thing you might notice is that when you are running around the world, it's only half as far to go until you end up back where you started. With larger numbers of zones, say, a 60-sided buckyball (soccerball), you might need to have 1/4 or 1/5 of the actual surface covered, I don't know, you do the math.
However, Unreal/UT also has a 3 zone 'see through' limit, meaning, you can see through the zone you're in to
the zone just past that, then the zone just past that, then the zone just past that, but you can't see past
THAT. At that point, you will see the texture on the zone portal. So, you can either limit the visibility of the
zones, or use non-textured or otherwise invisible textures on the zone portals. Do that LAST as you will want to
keep an eye on alignment all the way to the end. What you'll be seeing then is the 'closet' area past the zone,so
again, be creative.
Speaking of which, GoldenPi sends this advice: "I had a similar problem in a level a while ago (coop cube,
I think its lost now). There is a solution. If you just add a small fog effect to the level and then set the texture
on the zone portals to look like the fog, it will make it impossible to see the limit. You are still limited of
course, but it looks a bit better."
Limiting zone visibility is better and trickier and more fun. On planetoids, this means keeping the curvature up (small planet) or the 'atmosphere' shallow. If you can jump high enough to see more than 3 zones deep, you'll see the problem. So, don't plan on putting in high sniper towers on small planets. Make the planet large enough so that even in the tower, the 'horizon' is pretty far off. In centrifuges, I found that 7 is the limit on the number of segments if you can see them all. I use the 'ceilings' to 'create' a 'structure' in the center. It looks like the hub of a wheel. This hides the problem behind this hub, so you can't see it. If you are doing a large space station, like in 2001 (there is map 2001][ which does this I think), then you can have as many segments as you want, because you can only see into the two adjacent zones.
Many thanks to Art for pointing out these limits. Art has made a nice starter brush: GOD.zip(GreatOutDoors). Art says: "All ya need to do is subtract a few of 'em in, toss in zoneinfos and warpzoneinfos, and detail to your heart's content. I'm not really planning to make a level, just wanted to see a 'round' world thing."
So you have created a sweet little planet, and now you want to place it in the cosmos. Fair enough. But before you make that skybox, which is a good instinct, let me point this out - rotation is a bitch. Unless you do a lot of tricks with the skybox, it won't look right. Each area that makes up your planet has it's own sky. At the 'equator' the clouds, stars, etc., would be moving in a straight line, but at the 'poles', they'd be rotating about the center.And in the middle latitudes, in a big wide off-center arc. You may have better luck animating each area's sky surface textures. For a skybox to work that way, you might be able to make a roughly spherical 'box' and then animate each surface in that sphere in such a way that it appears to rotate. But remember, there is only one 'up', so only the top of your skybox would be seen, and it would be the same in every area. Note that if our first thought (to make a sphere in space and put gravity zones around it) might work with rotation nicely, if you could do that.
News!
I got this from Michael Harris:
Just revisited your "Advanced Advanced Portals In UnrealEd" page.
Thought you might be interested to know there is another game/engine out
that lends itself to this, though in a somewhat different way. The engine
is the Serious engine, from www.croteam.com. The games, so far, are
Serious Sam: First Encounter and Serious Sam: Second Encounter (and there
is an X-Box version that combines the two, but provides no mapping/modding
tools)....... and a Serious Sam: Gold that combines the two that is due out
in February or March. (And an all new engine currently in development,
that will be even more powerful.)
Multigravity:
- supports assigning different gravity types (parallel, cylindrical,
central (spherical), torus and standard up/down/north/south/east/west) to
different volumes (sectors) of space within a given map
Portals:
- portals are just visual portals providing views to elsewhere..... cannot
be shot or walked through...... though can be combined with a teleporter to
approximate the effect (the good news is that much of the need that exists
for using portals in Unreal to create non-euclidian effects is satisfied in
Serious by the use of gravity types..... such that there is much less need
for portals).
A cylindrical gravity effect for a simplified wheel centrifuge/ringworld
setting requires very little effort, without having to actually rotate the
setting. (A more "physics correct" centrifugal/centripetal effect, in
which real or apparent rotation of the wheel/ring generates subtler
non-intuitive coriolis effects inherent in such a situation, might face
performance issues arising from actual rotation of and player interaction
with such rotating complex geometry.... and/or require some custom coding
to supply those subtler effects without actual rotation.)
And Escher-like worlds become straightforward (but still hard work)
exercises:
- cylindrical, switchable cylindrical and a somewhat Escheresque
hypercube-like multigravity examples/tutorials ship with the game
- and a full blown, robust Escher-like labyrinth map is currently in public
beta at http://files.seriouszone.com/download.php?fileid=586
Tutorials covering cylindrical and switchable cylindrical gravity can be
found under GravityMarker and GravityRouter on
http://www.seriouszone.com/features/tutorials.php A third tutorial
discussing more aggressive carving up of space into sectors and assigning
various gravities currently to them ships with the game in text form.... a
graphical version of it will be up soon at the above address under
something like "Multigravity Sectoring".
Thanks Michael
Dave A.
******************************
I got this tip from Rachel C.:
******************************
I've been looking for a way to create ringworlds, etc. Until now I've been using smoke and mirrors, but my
trick will solve your problem with the sky. There is a script that allows you to link the fake backdrops in a zone
with any SkyZoneInfo you choose. Create a new class under ZoneInfo and type:
//===========================================
// MSkyZoneInfo.
//===========================================
class MSkyZoneInfo expands ZoneInfo;
var() SkyZoneInfo WhatSkyZone;
simulated function LinkToSkybox()
{
SkyZone = WhatSkyZone;
}
Put one of these in each of the ring's zones (say you have six). Then put six SkyZoneInfo's in the exact same location
in your skybox (cut and paste the Location under Movement) and rotate each of them to 1/6 a full circle (in UnrealEd,
360 degrees = 65536. It's not exact, but no one will notice). Link the MultiSkyZoneInfo's with the appropriate
SkyZoneInfo, and you will end up with a ringworld that has a seamless (and problem free) sky.
-Rachel C
P.S. I feature this technique in a level I'm working on right now, called DOM-Satellite. I will release it to Nalicity
soon.
******************************
I haven't tried it yet, but it sounds great. This would be easy to do for centrifuges and barrel worlds, just set as many as you need and rotate (pitch or roll as needed) by the amount needed. Divide 65536 by the number of segments you have for the exact number. If you're doing planetoids or hollow worlds (3D) it's more fun, and left as an exercise for the reader.
Freakin' Excellent Tutorial Sites: